
Okay, so I decided to upgrade my kitchen with a beverage refrigerator, and I wanted it to blend seamlessly with my cabinetry. That’s where the “panel ready” part comes in. Basically, it means you can attach a custom cabinet panel to the front of the fridge, so it looks like just another cabinet door. Here’s how I did it:
The Hunt for the Right Fridge
First, I needed to find the actual refrigerator. This took some time. I scoured appliance stores and websites, looking specifically for “panel ready” beverage refrigerators. It’s important to make sure the model you choose is actually designed for this, not all of them are.

Measurements and Planning
Once I found a few models I liked, it was time to get serious with measurements. I measured the space where I wanted the fridge to go, very, very carefully. Height, width, depth – everything. I also checked the manufacturer’s specifications for the fridge to make sure it would fit, including any extra space needed for ventilation or the door swing.
Ordering the Panel
With the fridge picked out and the measurements triple-checked, I contacted my cabinet maker. I’d done a few things in my kitchen, and I would contact them. They needed the exact make and model number of the fridge to build the custom panel. This is because the panel needs to fit perfectly, with the right cutouts for hinges and handles. I selected panel style and sent them the style of my kitchen.
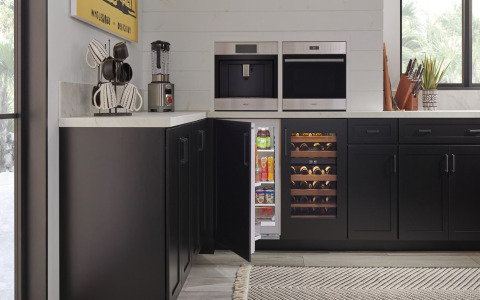
The Fridge Arrives!
Exciting day! The beverage fridge arrived. I made sure everything was in order before the delivery guys left. I inspected it for any damage, and made sure all the parts were there.
Installing the Refrigerator (Carefully!)
Now, the tricky part. With the help of a friend (definitely a two-person job!), I carefully slid the fridge into place. I was so careful, and followed the manufacturer’s instructions to the letter. Making sure it was level was a bit of a pain, but crucial for the panel to align correctly later. I plugged it in and give it some time to work.
Attaching the Panel
The cabinet panel arrived a few days later. Now, I feel like the instructions that came with the fridge for attaching the panel were…not great. I ended up watching a few videos to make sure I understood the process. Basically, it involves carefully aligning the panel, marking where the screws need to go, and then securing it to the fridge door. Taking your time is key here – you don’t want to mess up your beautiful new panel!
The Finishing Touches
Once the panel was on, I carefully installed the handle that matched my other cabinets. A little bit of adjusting was needed to make sure the panel was perfectly aligned and the door opened and closed smoothly. That was a fiddly bit, I have to admit.
Enjoying the Results!
Finally, I stood back and admired my handiwork! The beverage fridge looks fantastic – completely integrated into my kitchen. It’s so much nicer than having a standalone fridge sticking out. It was a bit of work, but totally worth it in the end. Now, time to stock it up with drinks!


