
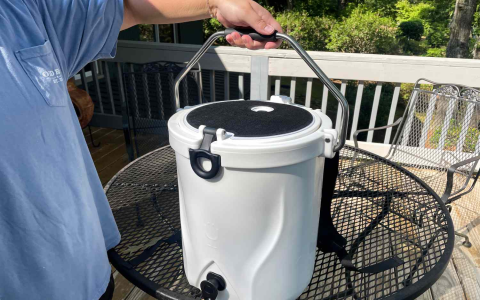
Alright folks, let me tell you about this weekend’s project: a beverage cooler and dispenser. I was tired of lugging around a heavy cooler every time we had a BBQ, and those flimsy plastic drink dispensers always leak. So, I decided to build my own!
First things first, I hit up my local hardware store. I grabbed a decent sized insulated cooler – not the cheapest, but also not top-of-the-line. Then, I spent some time wandering the plumbing aisle. I picked up a couple of stainless steel spigots (gotta make sure they’re food-grade!), some tubing, connectors, and a few other bits and bobs. Basically, anything I thought I might need. It’s always better to have extra than to have to make a second trip, right?
Back at the house, I emptied out the cooler and started planning. I wanted two dispensers – one for lemonade and one for iced tea. So, I carefully measured and marked where I wanted the spigots to go. This is important – measure twice, cut once! I used a hole saw attachment on my drill to make the holes. Take it slow and steady, you don’t want to crack the cooler.
Next up was attaching the spigots. This was probably the trickiest part. Getting a good, watertight seal is key. I used some plumbers tape on the threads and tightened them down good and snug. I also added some silicone sealant around the outside, just for extra insurance. Let that sealant dry completely before moving on!
Now for the internal plumbing. I cut the tubing to the right lengths and connected it to the spigots inside the cooler. I made sure the tubing reached the bottom of the cooler so you can get every last drop of that sweet, sweet beverage. Use those connectors I mentioned earlier to make sure everything is nice and secure.
Once everything was plumbed and sealed, it was time for the leak test! I filled the cooler with water and let it sit for a few hours. Thankfully, no leaks! If you do find a leak, just tighten things up or add a little more sealant.
Finally, I added some labels to the spigots so everyone knows what’s what. “Lemonade” and “Iced Tea” in big, bold letters. You don’t want any accidental mix-ups!
And that’s it! My DIY beverage cooler and dispenser is complete. It worked great at the BBQ yesterday. No leaks, and the drinks stayed nice and cold. I’m super happy with how it turned out. Definitely a worthwhile weekend project.
- Materials: Cooler, stainless steel spigots, tubing, connectors, plumbers tape, silicone sealant, drill with hole saw attachment.
- Tools: Drill, measuring tape, wrench, screwdriver.
It’s not perfect, but it’s functional and it’s mine! What weekend projects have you guys been working on?


