
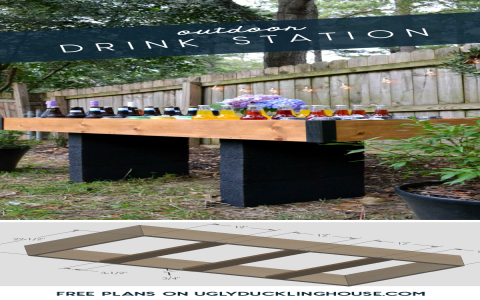
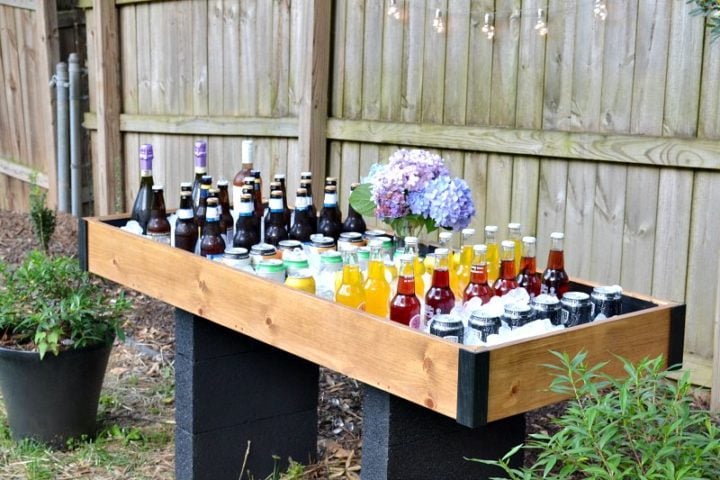
Alright, so I’ve been meaning to share this little project I wrapped up. You know how it is when you’re out in the yard, enjoying the weather, and you gotta keep running back inside for a cold one? Yeah, that got old real fast for me. So, I decided it was time to build a proper spot for drinks right there on the patio.
Getting Started: The Idea and the Messy Plan
First thing I did was just kinda sketch out what I wanted. Nothing fancy, just scribbles on a notepad, really. I thought about how big it needed to be, what kinda stuff I wanted to store in it – you know, bottles, cans, maybe some glasses, an ice bucket. I measured the space I had in mind out back, making sure it wouldn’t be too clunky or in the way. It’s important to think it through a bit before you start cutting wood, that’s for sure.
Gathering the Goods: The Hardware Store Run
Once I had a rough idea, I headed off to the big box store. Man, I love wandering those aisles. I spent a good while picking out the lumber. I went with cedar because it holds up pretty well outdoors and I like the smell of it when you’re working with it. Then I grabbed a whole mess of other stuff:
- Deck screws, ’cause they’re tough.
- Some exterior wood glue for extra strength.
- Hinges and a handle for a little door I planned.
- Sandpaper, of course. Lots of sandpaper.
- And a good outdoor wood stain and sealer.
My cart was pretty full by the time I checked out. My wallet felt a bit lighter too, ha!
The Build: Sawdust and Sweat
Then the fun part started – actually putting this thing together. I cleared out a space in the garage and got my tools ready. First, I built the main frame. This is always the tricky bit, making sure everything is square and level. There was a lot of measuring, cutting, and then re-measuring. I’m not gonna lie, I had to re-cut a couple of pieces. Measure twice, cut once is the saying, but sometimes I’m more of a measure once, cut, then measure again and grumble a bit.
Once the basic box was up, I started adding the shelves. I wanted a couple of different heights to fit various things. Then I built a little door for one section, just to keep things looking a bit tidy. I also decided to make the top a bit like a countertop, so I used some thicker pieces of cedar there, made it nice and sturdy for setting drinks on or whatever.
I even managed to integrate a spot for a drop-in ice bucket. Just cut a hole in the top and built a little support underneath. That was a bit fiddly, getting the cutout just right, but it worked out pretty good.
Finishing Touches: Making it Look Decent
After all the cutting and screwing was done, it was time for sanding. So much sanding. But it makes a big difference, gets rid of all the rough edges and splinters. Then, I applied a couple of coats of that outdoor stain and sealer. I picked a nice natural cedar color, just to enhance the wood, not cover it up too much. This part takes patience, waiting for coats to dry, but it’s super important for protecting the wood from the rain and sun.
I also screwed on a cool, rustic-looking bottle opener to the side. Gotta have that! And a couple of hooks for hanging a towel or some barbecue tools.
All Done: The Big Reveal (to Myself)
Moving it from the garage to the patio was a bit of a grunt. It wasn’t light, especially with all that solid wood. But I got it into place, and man, it looked great. I stepped back and just admired it for a bit. There’s something really satisfying about building something with your own two hands, you know?
Then came the best part: stocking it up! Filled it with drinks, put some ice in the bucket. The first time I grabbed a cold one from it, sitting out back without having to go inside, it just felt right. Totally worth the effort. Now my backyard setup feels a lot more complete. It’s already gotten a lot of use, and I’m pretty proud of how it turned out.


