Taste of Home: Explore cuisine, appetizers, desserts, holiday dishes, and share healthy cooking tips in one stop.
Tuesday, May 20, 2025
  • Login
  • CUISINE
  • DESSERTS
  • BEVERAGES
  • RECIPES
  • INGREDIENTS
  • KITCHEN TIPS
No Result
View All Result
  • CUISINE
  • DESSERTS
  • BEVERAGES
  • RECIPES
  • INGREDIENTS
  • KITCHEN TIPS
No Result
View All Result
Taste of Home: Explore cuisine, appetizers, desserts, holiday dishes, and share healthy cooking tips in one stop.
No Result
View All Result
Home KITCHEN TIPS

Quick KitchenAid 60 Minute Dinner Rolls: Super Easy Recipe for Beginners!

nnxt by nnxt
2025-01-18
in KITCHEN TIPS
0
Quick KitchenAid 60 Minute Dinner Rolls: Super Easy Recipe for Beginners!
0
SHARES
0
VIEWS
Share on FacebookShare on Twitter

So, I decided to bake some dinner rolls today. I’ve been craving some homemade bread lately, and I stumbled upon this recipe titled “KitchenAid 60 Minute Dinner Rolls”. I thought, “Why not give it a shot?” Sixty minutes sounded pretty quick for making bread from scratch.

I gathered all my ingredients first. I made sure I had everything I needed: flour, yeast, sugar, salt, milk, butter, and an egg. I always do this because it’s annoying to realize you’re missing something mid-recipe. Then I warmed up the milk and melted the butter in the microwave. Nothing fancy, just a quick zap to get them to the right temperature.

Quick KitchenAid 60 Minute Dinner Rolls: Super Easy Recipe for Beginners!

Next, I got out my trusty KitchenAid stand mixer. This thing is a lifesaver. I dumped in the warm milk, melted butter, sugar, and yeast. Gave it a little mix with the dough hook and let it sit for a few minutes. I wanted to make sure the yeast was active and bubbly.

Once the yeast was looking good, I added in the egg and salt. Then, gradually, I started adding the flour, one cup at a time. I let the mixer do its thing, kneading the dough until it was smooth and elastic. It took about 5 minutes or so, but I kept an eye on it to make sure it didn’t get too tough.

After the dough was ready, I turned it out onto a lightly floured surface. I divided the dough into equal pieces, around 12, and shaped them into little balls. They looked so cute! I placed them on a baking sheet lined with parchment paper, making sure to leave some space between each one.

Then came the waiting game. I covered the rolls with a clean kitchen towel and let them rise in a warm spot for about 30 minutes. They puffed up nicely, almost doubling in size. While they were rising, I preheated the oven to 400 degrees Fahrenheit.

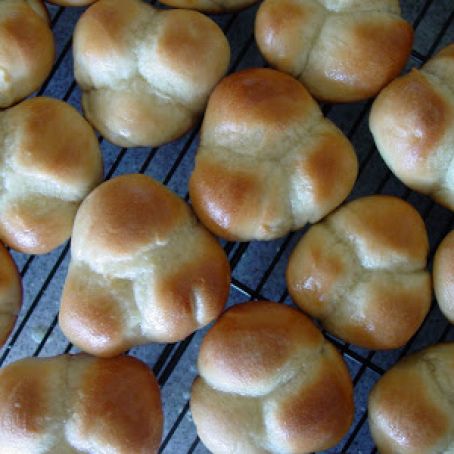
Finally, it was time to bake! I popped the rolls into the oven and baked them for around 15-20 minutes. They turned golden brown, and my kitchen smelled amazing, like a bakery. I took them out and brushed the tops with a little melted butter for extra flavor.

The Result

  • Appearance: Golden brown and fluffy.
  • Texture: Soft and tender on the inside, with a slightly crusty top.
  • Taste: Buttery and delicious. They tasted like they took hours to make, not just one!

These rolls were a hit! They were perfect with dinner, and I even had a couple for breakfast the next day. I’m definitely making these again. The recipe was easy to follow, and the KitchenAid mixer made the whole process so much simpler. It was worth it. I recommend giving it a try if you want some homemade goodness without spending all day in the kitchen.

Previous Post

Unlock Thai Flavors: Bangkok Cuisine Crossword Help.

Next Post

Healthy Sugar Free Strawberry Desserts: Sweet Treats Without the Guilt!

nnxt

nnxt

Next Post
Healthy Sugar Free Strawberry Desserts: Sweet Treats Without the Guilt!

Healthy Sugar Free Strawberry Desserts: Sweet Treats Without the Guilt!

Recommended

How do companies make artificial chicken flavour ingredients? (A simple look at the production process)

How do companies make artificial chicken flavour ingredients? (A simple look at the production process)

4 hours ago
Want the real Captain Morgan Long Island Iced Tea ingredients? Get the classic recipe here.

Want the real Captain Morgan Long Island Iced Tea ingredients? Get the classic recipe here.

9 hours ago

Trending

A Comprehensive Review of Unflavored Beverage Enhancer Tinctures for Better Dosage Control

A Comprehensive Review of Unflavored Beverage Enhancer Tinctures for Better Dosage Control

6 months ago
Cuisine a la carte vs Table dhote: Whats the Difference and Which is Better

Cuisine a la carte vs Table dhote: Whats the Difference and Which is Better

5 months ago

Popular

Sini Kitchen Cleaner: The Easy Way to a Sparkling Kitchen

Sini Kitchen Cleaner: The Easy Way to a Sparkling Kitchen

6 months ago
What Are the 43 Ingredients in Licor 43 Liqueur?

What Are the 43 Ingredients in Licor 43 Liqueur?

6 months ago
Cuisine a la carte vs Table dhote: Whats the Difference and Which is Better

Cuisine a la carte vs Table dhote: Whats the Difference and Which is Better

5 months ago
Top Grilled Olives Recipes: Learn How to Get that Perfect Char

Top Grilled Olives Recipes: Learn How to Get that Perfect Char

4 months ago
A Comprehensive Review of Unflavored Beverage Enhancer Tinctures for Better Dosage Control

A Comprehensive Review of Unflavored Beverage Enhancer Tinctures for Better Dosage Control

6 months ago
Taste of Home: Explore cuisine, appetizers, desserts, holiday dishes, and share healthy cooking tips in one stop.

Explore cuisine, appetizers, desserts, holiday dishes, and share healthy cooking tips in one stop.

Category

  • BEVERAGES
  • CUISINE
  • DESSERTS
  • INGREDIENTS
  • KITCHEN TIPS
  • RECIPES

Follow Us

  • CUISINE
  • DESSERTS
  • BEVERAGES
  • RECIPES
  • INGREDIENTS
  • KITCHEN TIPS

© 2025 Magic Kitchen - https://www.laonanhainnxt.com

No Result
View All Result
  • CUISINE
  • DESSERTS
  • BEVERAGES
  • RECIPES
  • INGREDIENTS
  • KITCHEN TIPS

© 2025 Magic Kitchen - https://www.laonanhainnxt.com

Welcome Back!

Login to your account below

Forgotten Password?

Retrieve your password

Please enter your username or email address to reset your password.

Log In